

Getting Started Online
Whether you are just getting started online or want to refresh on some of the features that will benefit you and your business, this section will provide you with an overview of how to make the most of you Häfele account.
Your online account
From the basics within 'My Account' to managing your account with ease through 'My Häfele', this section will help you unlock the capabilities of you your online account.
1. Select 'Sign in' in the top right hand corner of the website 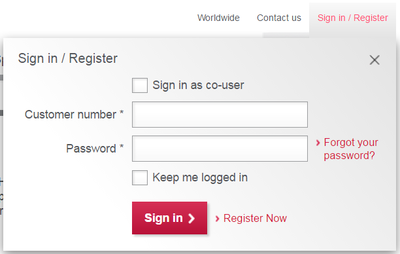
2. Enter your account number and password. These will have been sent to you in an email after registering for an account.
3. If you want to log in as a co-user then select 'sign in as co-user' and have your account number (customer number), username and password ready. There is more information about co-user accounts further down on this webpage.
4. Select 'sign in'. You will now be able to view pricing and start purchasing
If you are having issues signing in please click here.
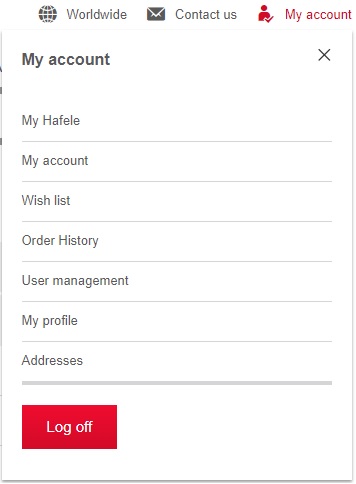
Once you have logged into your account, select ‘My Account’ to access your account summary. This will show open orders and any recently edited wish lists. In the 'My Account' section, you will be able to select from the below options:
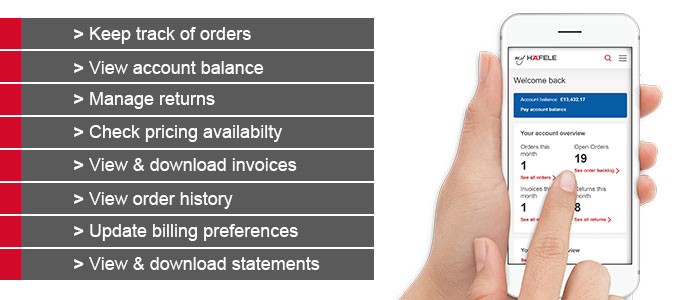
Whilst the website’s 'My Account' section (covered in more detail in the above section of this webpage) allows you to manage wish lists, co-users and shipping addresses, My Häfele offers the next level of convenience, allowing you to manage everything covered below. Click here to find out more about My Häfele
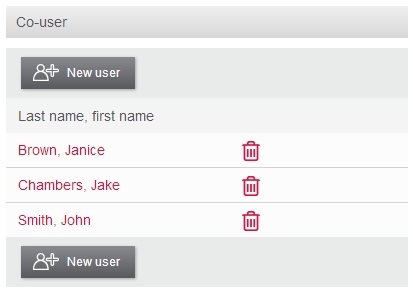
Setting up co-users allows multiple users within your business to operate within your Häfele account. As the main account administrator, you can limit the access ability to place orders for your co-users. Setting up co-users is simple:
1. Login to your account
2. Navigate to ‘My Account’
3. Select ‘User Management’
4. To create a new co-user account, select ‘New User’
5. Complete the form and save.
**Please note that the user will not be able to place orders unless the ‘net price’ option is ticked and ‘allowed order’ is set to ‘yes’**
6. Send the username and password to those who you choose to operate as co-users
Ordering, delivery and payment options
We've got a range of different functionalities, designed around your needs, to make ordering as simple as possible.
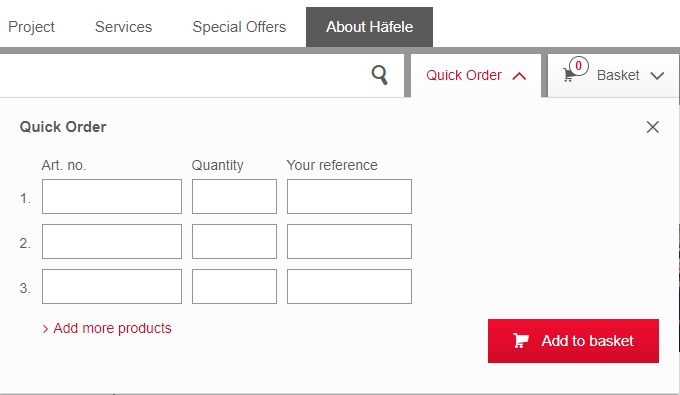
Quick order allows you to do exactly what it implies; add items to your basket at any time, simply by entering the part number, quantity and job reference (optional). You can find the quick order feature in the top navigation next to the basket icon. By selecting “add further items”, you can enter as many items as you wish. Select "Add to Basket" to add these to your basket.
Please note, upon entering the part number and quantity, the system will verify the number. If incorrect you will receive a message asking you to check the entered number.
You can upload up to 50 items to your shopping basket from an Excel or CSV file - great for saving time when you know exactly what you want to order. Simply by following the below steps:
1. Login to your account
2. Navigate to ‘Offline Order File’, located on the ‘My Account’ dashboard or the Basket page
3. You will need to upload the correct file to the website. To locate the correct file format please select the more info link.
4. Select "Select File" in the ‘My Account’ section or the "Upload File" in the shopping basket. You will be able to upload a file from your computer.
5. Once the file has been uploaded, select 'Add to basket' to add the items to your order

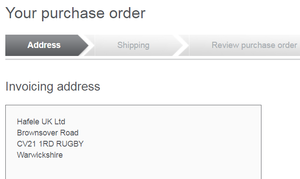
Select 'checkout' from your shopping basket page. You will now see a list of delivery addresses available for your account. If you want to add a new address, scroll to the bottom of the page and select 'New delivery address'. To view all delivery addresses, navigate to the ‘Addresses’ page located within the 'My Account' menu.
If your invoice address is incorrect please contact our Customer Support Team.
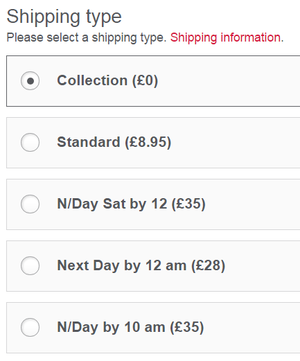
After selecting your delivery address, you can select a shipping method for your order. The standard shipping method will be the default selection. The shipping costs will be displayed for each option – costs may vary depending on your items. You will see these charges on the order review page. If you qualify for FREE shipping, this will be displayed on the place order page.
Many of our customers are invoiced directly to their billing address, which is convenient for if you complete order purchases often online. If you would like to have this option please contact our Customer Support team.
You will have the option to pay via credit card or, if applicable, to request a proforma invoice.

How to use your shopping cart
You may need to make small changes to your order once it's been added to the cart. Here, you can find out exactly how these work.
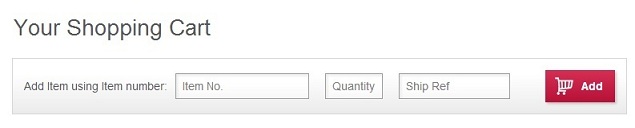
You can add items to your basket without going back to a product page. This option will be shown at the top of the Shopping Cart. Simply enter the part number, quantity, and shipment reference and the item will be added to your cart. The system will automatically verify the item number and availability.
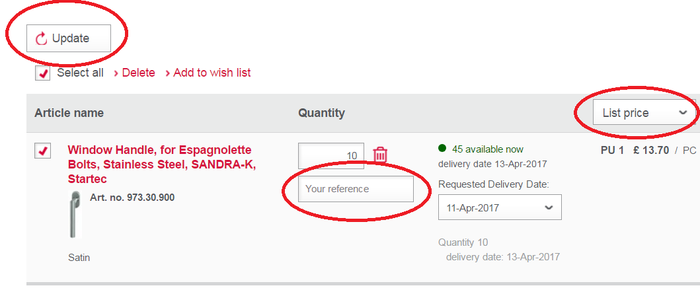
You can request a shipment date for each item line in your shopping cart. The earliest available date will be shown for each but if you wish to change this, simply click the dropdown menu and select a date from the calendar.
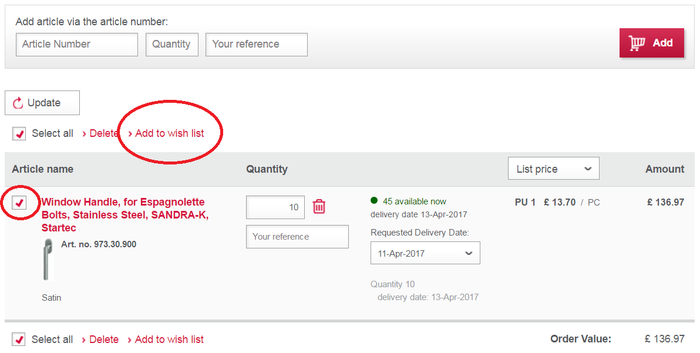
You can make modifications to your cart by selecting the checkbox next to each item and either deleting items, add them to your wish list, and amending the quantity or shipment reference. You can select a different shipment date for each item. See above for more details. Remember to click the update link each time you make a change.
The shipment reference allows you to differentiate between orders, which is helpful when you receive your shipment.
You are also able to change whether you view the list price, sales price or net price for your entire order.
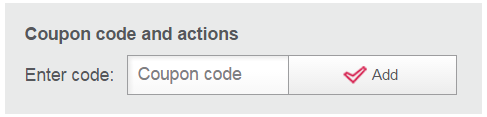
If you have a coupon code that can be applied to your order, enter it into entry box, located in the bottom right hand corner, ensuring you click the ADD button. The code will be automatically validated and any adjustments to your order will be made.
Product pages, comparison tools and wish list
How to make the most of our product pages, comparison tools and the wish list functionality
The wish list is a feature many of our customers find useful. The feature allows you to generate quotes which can be saved and added to your cart at a later stage. Also, if you have a regular order, you can save the order and simply add it to your basket in one go each time. Setting up a wish list is simple. Watch the short tutorial or follow the steps below:
1. Login to your account
2. Go to ‘My Account’
3. Select ‘wish list’
4. Select ‘Create new wish list’
5. Provide a name for your wish list e.g Mrs Eden
You can then add products to your wish list by following one of the below:
- Selecting 'add to wish list' on the product pages
- Adding products to the basket via the quick order form, then selecting them to add to wish list
- Adding products to the basket via product order import, then selecting them to add to wish list
The product page is the home of the product detail and where you will be able to see / select all the available options for a product, such as finishes, size etc. On most product pages, you will find the below:
- Item selection table
- Available finishes and styles
- Options and accessories
- Links to catalogue pages
- Product details
- Videos
- CAD details
Recommended products carousel at the bottom of the page - this highlights products that customers often purchase with the product you are viewing.
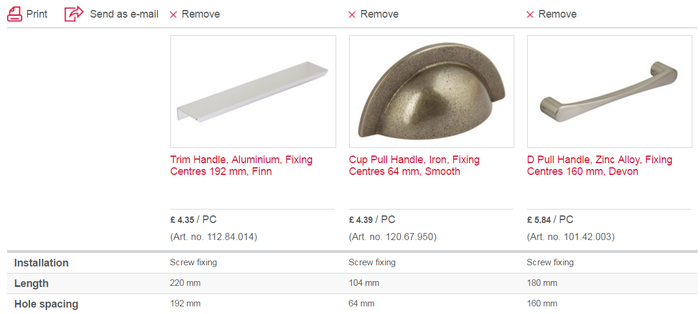
The comparison tool helps with decision-making; whether you are unsure which product is most suitable for your project, or even if your customer wants to see options side-by-side. To use the tool, simply follow the below steps:
1. Select a number of products to compare from either the category page or the product page.
2. Once you have selected more than one product, select the 'Compare Selection' link
3. Your comparison page will be generated. You can print this page or email it to yourself